Pagina's

18 december 2017

Dadirri cardigan met Oona jurk


Het lijkt alsof ik 's winters niet zonder breiwerk op de pennen kan, dus zodra dit project klaar was, zette ik meteen iets nieuws op, en testte het Dadirri vestje van CompagnieM. 


Een speciaal patroontje verdient ook speciale wol, dus ik gokte dat het met de maatvoering wel goed zat en toog naar een fijne lokale winkel voor wol met een verhaal. Moeke Yarns is een Nederlands/Roemeens bedrijf dat eerlijke en duurzame wol van oude roemeense schapenrassen produceert en zo probeert bij te dragen aan het instandhouden van oude tradities. Doordat er op oude machines gesponnen wordt, lijkt het garen wel wat op handgesponnen wol, met lichte onregelmatigheden erin, zo mooi vind ik dat! De wol voelde bij het verwerken nog lichtjes stug, maar na het wassen en blocken werd het zalig zacht.


Het patroon is zo uniek omdat het op maat voor je berekend wordt. Je kiest zelf net zulk dik of dun garen als je wilt, en aan de hand van de maten van het proeflapje en je model, rolt je patroon zo uit de calculator. De instructies zijn uitgebreid en duidelijk, toch zou ik een echte beginner niet direct aanraden dit als allereerste breiproject te kiezen. Tenzij je een ambitieuze beginner bent ;-)


De kleuren van het vest hield ik neutraal, zodat het met bijna alles in de kast goed combineert. Hier draagt ze er een Oona jurkje onder, in een simpele katoen.


Pattern:
Cardigan: Dadirri cardigan by CompagnieM.
Dress: Oona dress by La Maison Victor

Yarn:
Moeke Yarn Elena Natural and Grey, by Wol zo Eerlijk 


12 november 2017

Trailblazer vest


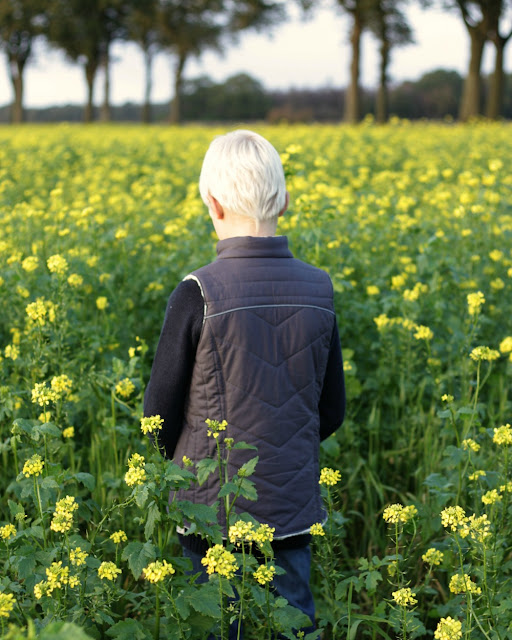
Sewing for older boys can be quite a challenge. They develop their own style and have lots of opinions about what is cool enough to wear these days. But when I listen to them and sew something that matches with their ideas, they are by far my most grateful customers.


Testing the new kids version of the Trailblazer Vest pattern by Twig&Tale seemed the perfect opportunity to hit the bull's eye. It includes pockets and zipper, a collar and has the opportunity to sew a warm puffer style version, so it's perfect for the grown up look my boys love. There is also a nice windflap, which I omitted in this version, because I wanted those matching chevron stripes to be visible. The instructions are very detailed - there is even a video on how to sew the zipper - and meant to hold a beginner's hand. They walk you through the construction from beginning to end.


The outer fabric is a thin cotton from Michael Miller quilted onto thick and fluffy batting. I had lots of fun playing around with the quilting design and used chevrons, horizontal and vertical stripes and a little piece of piping on the back yoke. With quilting, using piping and colourblocking, the possibilities to get creative are almost endless.
The lining is made out of one of the softest fabrics I've ever worked with: organic cotton sherpa by Michael Miller. Most organic cottons are softer than regular ones, but this one is pure heaven.


Not only does the kid feel cool now, he must be wrapped in the coziest garment I've ever sewn.


This vest exists in a grown-up men's version, too, and there is a lovely fisherman's add-on with lots of extra pockets for treasure hunters of all types. Today is the last day the pattern is on sale, so if you want it, grab it quick!


Pattern: Children's Trailblazer vest by Twig & Tale
Fabric: Michael Miller Cotton couture, color SC5333-META-D (outer)
and Michael Miller organic cotton sherpa (lining)

The fabrics for this vest were kindly sponsored by Michael Miller fabrics.

31 oktober 2017

A new Ila dress


Afgelopen winter naaide ik een Ila jurk die een echte voltreffer werd. Krakende vrieskou of zonnig zomerweer, spelen in het bos of op verjaardagsvisite, de jurk moest áán. Toen de lengte meer op die van een tuniek begon te lijken, wist ik dat het tijd werd voor een nieuwe.

Last winter I sewed an Ila dress that turned out to be a huge hit with my daughter. No matter if the weather was freezing or hot, if the occasion was fitting or not, she wore the dress whenever she could. When it started to resemble a tunic more than a dress, I knew it was time for a new one.


Bij Miss Matatabi vond ik een mooi dunne en zalig zachte babyrib, die ik combineerde met gouden paspel en een warm gele voering.

I found a nice soft and thin corduroy at Miss Matatabi and combined that with golden piping and a mustard yellow lining.


Mouwen liet ik achterwege, ze draagt 's winters het liefst een longsleeve onder haar jurk. De lengte vonden we samen nog iets te lang, maar aangezien het kind momenteel met lichtsnelheid lijkt te groeien, zal het niet lang meer duren voordat ook deze jurk tunieklengte bereikt heeft...

Sleeves were left out, she prefers layering her dresses with longsleeves in winter. It is still a bit long now, but since the girl seems to be growing at light speed these days, it won't be long before this dress has reached tunic length, too...


En wat denk je, mocht ik de onzedig korte jurk al uit de kast verwijderen? Niets ervan: 'Nu heb ik er gewoon twee!'

And guess what, was I allowed to remove the indecently short dress from her closet? Absolutely not: 'Now I have two!'


Pattern: Ila dress by Coffee&Thread
Fabric: Lightweight corduroy from Miss Matatabi (sold out)

20 oktober 2017

Barefoot romper


Mijn kleine meisje klimt opeens in bomen. Ik houd mijn adem in terwijl ze hoger en hoger gaat, of ineens ondersteboven als een aapje aan een tak bungelt.

My little girl discovered how to climb trees. It takes my breath away watching her high, high up there, or hanging upside down from a branch like a monkey. 

Alle mooie jurkjes in de kast zijn wel heel onpraktisch voor haar nieuwe hobby, dus naaide ik een Barefoot romper van Twig&Tale, een perfecte speeloutfit.

But all the pretty dresses in her closet are not too practical for her new hobby, so today I present you the Barefoot romper by Twig&Tale as a playproof treeclimbing outfit.


Deze harembroek geeft veel bewegingsruimte, en ik ben dol op de deugniet die ze erin wordt. Het patroon is ontworpen voor geweven stof en heeft veel verschillende opties voor een steeds net iets andere look.

This haremstyle romper has lots of room to move around freely and I love the way it looks on her. The pattern includes many options for different looks and is designed for woven fabrics. 


Ik naaide de broek in een zachte gespikkelde sweaterstof. Bij het gebruik van rekbare stoffen voor dit patroon is het wel belangrijk om de schouderbanden volledig te verstevigen.

For even more comfort, I made it from a thick jersey. When sewing this pattern in knit fabrics it's very important to use interfacing on the full length of the straps.


Twee antieke knopen en een stukje lint uit grootmoeders doos completeren het plaatje. En let vooral niet op de oude regenlaarsjes die ze weigerde uit te doen voor de foto's omdat die kennelijk onmisbaar zijn bij het bomen klimmen...

Two vintage buttons and a piece of vintage ribbon complete the look. And please ignore the old wellies that she refused to take off for photos as they're apparently essential for treeclimbing...


Pattern: Barefoot romper by Twig&Tale
Fabric: Soft jersey from the local fabric store 


16 oktober 2017

Stranded sweater


Als de dagen kouder worden, haal ik graag de breinaalden tevoorschijn. Na de noorse jongenstrui van afgelopen winter, lag er nog een bestelling van de andere kinderen. Hier is de David trui die ik voor de middelste breide. 


Hij koos zelf de kleuren wol uit - hij heeft talent, al zeg ik het zelf! En ik veranderde het motiefje om plaats te maken voor wat sterren in de schouderpas. Aantallen steken en dus maatvoering zijn precies als in het oorspronkelijke patroon.


De trui wordt naar goed scandinavisch gebruik van boven naar beneden gebreid, top down noemen ze dat. Zo hoef je na afloop geen stukken meer in elkaar te zetten. Sinds ik deze manier van breien voor het eerst bij dit peutervestje leerde, wil ik het liefst nooit meer anders.


Patroon: David sweater by Drops Design
Yarn: Drops Karisma colours 57, 45 and 77

24 september 2017

Cuddle horse with free pattern!


Een paar frisse dagen en bijbehorende koukleumende kinderen waren een goede reminder dat het hoogste tijd is voor warme winterplannen. Kruikenzakken stonden al tijden op het wensenlijstje, want wat is er nu heerlijker dan in bed opwarmen met een kruik en een goed boek als je koud en nat thuiskomt?

A few cold days and shivering kids were my wake up call to start thinking about warm winterplans. Hot water bottle covers had been on our wishlist for quite some time already. Nothing beats warming up in bed with a book and a warm water bottle after coming home cold and wet from school (Dutch kids cycle, you know...).


Maar toen kregen de kinderen lucht van de Wild things hotties van Twig&Tale, kruikenzakken in de vorm van dieren. Té leuk, vonden ze, en hun fantasie sloeg op hol. Kun je dan ook een kwal maken? Of een kikker? Of een paard? He ja, mama, naai gewoon eens een nieuw dier. Nu moet je weten dat ik geen tekenaar ben. Of ontwerper. Dat talent heeft mij echt overgeslagen. Maar vooruit, ik houdt van die bloedjes, dus ik probeerde het toch. Tong uit de mond en uren gummen, verscheuren en opnieuw beginnen, en toen was daar... tadaah! Een paard!

But then the kids found out about the Wild things hotties by Twig&Tale, hot water bottle covers that look like animals. They loved the idea and their imagination ran away with them. Could you also make a jellyfish? Or a frog? Or a horse? Please, mummy, let's make a new animal. Now I have to tell you a secret: I'm not a drawing artist. Or designer. At all. But I do love those kids, so I tried anyway. Tongue out of my mouth and hours of erasing, tearing it up, starting again, and all of a sudden... a horse was born! 


Maar nu komt het goede nieuws: Wij waren niet de enigen die hem leuk vonden, en dankzij een samenwerking met Lisa van Twig&Tale is er nu een digitaal patroon wat je gratis (ja echt!) hier kunt downloaden. Het is een add-on bij het oorspronkelijke hottie patroon, wat je erbij nodig hebt voor een compleet patroon. Dan kun je meteen een berg andere beesten naaien, wat beslist geen straf is! Voor wie snel is: het Wild Things hot water bottle covers patroon is alleen vandaag afgeprijsd.

And here is the good news: We weren't the only ones who liked him, and thanks to a collaboration with Lisa from Twig&Tale it is now available as a free add-on to the original Wild Things hotties pattern. Yay! For a full pattern and tutorial, you need the general pattern as well. But with all the cute designs, that won't be a punishment at all, I promise you. And if you're fast: the Wild Things hot water bottle cover pattern is on sale today only.

Pattern: 
Wild Things hot water bottle covers
free horse add-on and tutorial, both at Twig&Tale

Fabrics: Upcycled towels.

27 juli 2017

Pink baby clouds


A while ago a little girl was born into our family, and of course I couldn't resist sewing her a little welcome gift. I simply love sewing for babies. Making them something special feels like a way of acknowledging what a miracle the arrival of a new person really is. 


Another great thing about baby sewing is the little amounts of fabric you need. This ensemble was entirely made out of little scraps of delicous double gauze left over from this dress.


The little dress is the Grace dress, a free pattern. It has a few different views and closes with buttons in the back. The double gauze would have combined well with some lace or embroidery embellishments, but I think I love the simple look even more.


The shoes in size 1 are so tiny that I wasn't sure if I could put them together nicely. It turned out to be no problem, especially with these thin fabrics. The shoes are fully reversible, so should the nani iro not match her outfit of the day, they can be turned into a plain pink pair. The Wayfarer shoes pattern comes in a wide range of sizes up to 9 years old, so my kids are already picking fabrics...


Patterns:
Grace dress by Emma&Mona, Wayfarer shoes by Twig&Tale

Fabrics:
Kokka double gauze 'dusty peach' and Nani Iro 'fuccra rakuen hamilton'

23 juni 2017

Summer pixie


Toen de zomer bij ons eindelijk arriveerde, moest dat gevierd worden met een snel en simpel naaiproject.

At last summer arrived in our neck of the woods as well. And of course I had to celebrate with some quick summer sewing.


Ik gebruikte de Pixie pants van Twig&Tale en de Juliette top van Sewpony. Allebei zonder ritsen en knoopsgaten en dus zó klaar.

I used two quick patterns: the Pixie pants by Twig&Tale and the Juliette top by Sewpony. Both without zippers and buttonholes and finished in no time. 


Het patroon van de Pixie pants werd recent uitgebreid met verschillende tuinbroek-opties, maar ik koos de simpelste korte broek versie in een linnen wat bestand is tegen buitenavonturen. Omdat ik een klein verrassinkje niet laten kon, voerde ik de zakken met de stof van het topje en zette er een kantje tussen. Een klein detail toevoegen hoeft niet altijd veel tijd te kosten.

The Pixie pants were recently upgraded with a lot of cute romper options, but I picked the simplest pants version in linen that can survive all kinds outdoor adventures. Because I like little surprises, I lined the pockets with the blouse fabric and embellished with a piece of cotton lace. Personalizing a piece of clothing doesn't always have to take a lot of effort, right?


Voor het topje gebruikte ik een zachte katoenen voile, perfect voor de echt warme dagen. De zoom van de kraag besloot ik even snel met de rolzoomvoet te naaien. Niet een heel slim idee, want rondingen met dit voetje zijn toch wel wat uitdagend. Enfin, ik worstelde en ik geloof dat ik won.

The top was made from a soft cotton voile, perfect for real hot days. I practised with my rolled hem foot on the collar, which was probably not the smartest idea, because rolled hems on curves are a bit challenging to say the least. But I think I won!


Nu hoop ik op een warme zomer, zodat ik mijn niet zo heel kleine meisje veel in dit setje kan zien rondlopen.

Now I'm hoping for a lot more sunshine so I can see my little one running around in this outfit all summer.


Patterns: Pixie pants by Twig&tale and Juliette top by Sewpony
Fabric: Green linen (local shop) and flower voile by Roomseven


19 mei 2017

Geneva cardigan with zipper tutorial


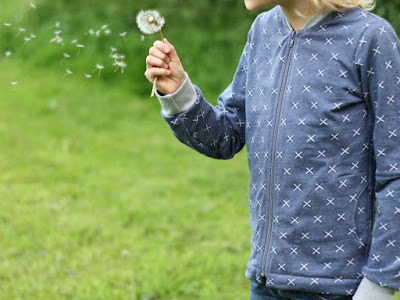
When I made my first girls version of the Geneva cardigan, in my head I was planning out boys options already. I loved the ribbed band option the moment I saw it, and immediately thought it would look awesome with a zipper. Boys love zippers and putting a zipper in any garment is basically a guarantee for a happy kid around here. 


Since the pattern already has more options than you can reasonably ask from a pattern designer, I decided to hack it. And to put together a tutorial for all of you to enjoy (keep reading if you want to see it).


This post is part of a fun blogtour showcasing lots of lovely Geneva cardigans. Do check them out if you want to see some truly inspirational examples:

And today is the last day you can buy any Coffee&Thread pattern with a 15% discount with the code 'GENEVAPATTERNTOUR'


Zipper tutorial


For a size 11 cardigan I used a 45 cm separating zipper, some thin interfacing and regular single fold bias tape.


First redraw your front bodice pattern piece. Draw 2 new lines at 0.5 cm distance perpendicular to the center front line. One will be your new fold line the other one is the cutting line and marks the seam allowance. Cut your fabric along the new cutting line and interface the seam allowance with a 1.5 cm wide strip of thin interfacing.


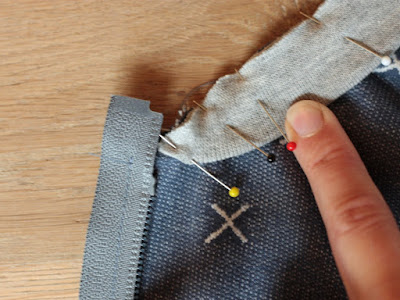
Separate the zipper and put one half facing down (right side of zipper facing right side of fabric) with the zipper stop at 1 cm below the neckline. Measure the width of your zipper and make sure the middle of the zipper teeth are placed exactly at 1.5 cm from the edge of the fabric. Pin and sew the zipper at 1 cm from the fabric edge. Repeat on the other side.


Attach the ribbed neckband following the instructions and make sure the neckband ends just next to the zipper.


Now fold the zipper outwards on both sides, making it dissapear between two layers of fabric. Pin your bias tape on top with the right side facing down and sew with 1 cm seam allowance. Clip corners and turn. Sew pockets and sleeves as described in the instructions.


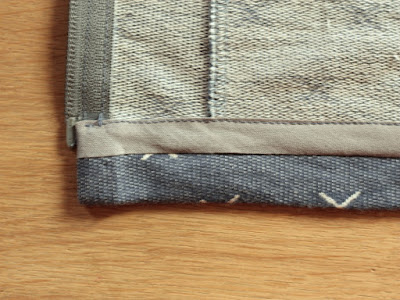
Attach bias tape to the bottom hem at 0.7 cm from the edge. 


Fold the bias tape upwards and fold your hem allowance upwards. The right side of the zipper faces down on the right side of the fabric.
Stitch a vertical line extending the stitching line on the zipper. Clip corners and turn.


Topstitch the bias tape close to the edge.


Topstitch along zipper and neckband as described in the instructions. Make sure to catch the zipper in the topstitching.


And now enjoy your zippered cardigan!